Pages

Creative Woodworking

Tuesday, July 31, 2012

Front Deck - July Progress

The door to nowhere, gets a deck....July Progress!
Post hole digging, not fun and it was super hot.
Girls always add to the fun.
Shoulder height, perfect.
Time for concrete.
Footing 1 done, 3 more are needed for the main deck.
How many bags of concrete so far? Nevermind.
Footings 1, 2, 3, 4.
Filling in, luckily we had a nice pile of fill waiting for this area.
Off comes the sliding.
Drip edge attached, ready for flashing.
Flashing on, bring on the ledger.
Ledgers are designed with off set blocking, this will keep the water off the house.
Level? I hope?
Tighten up.
 Rock surfing is always appropriate!
 Transit time.
Ledgers need to be in line. 
 Ledgers 1, 2 and
Three.
Step down in this area, thank you water spickett...not.
 Posts & plates, now your talking.
 The step down in our siding has always looked strange, not sure how to deal with that, as it will still show at stairs...ideas anyone?
More posts and plates.
 Joists
 and more joists.
Break time!
Time for joist hangers, this took a while.
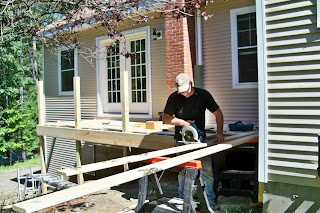
Decking!!
Losing shade quickly it seems, the last few pieces will be notched around the posts.
Railing tomorrow :)


Saturday, June 30, 2012

The Door to Nowhere..Gets a Deck!

The door to nowhere (as the girls call it), is getting a deck.


Current project, will post progress shots during vacation week.

Thursday, April 5, 2012

Lessons Learned


My Subcontractor - My Friend?? 

Okay, so you hire a "friend" as a subcontractor, didn't bother to check his references...what could go wrong?

Oh my.
This totally happened to us.

Lessons learned: 
  • Just because your kids go to school together and you live in the same town, doesn't make you friends. Got it, "acquaintance". 
  • Just because your acquaintance runs a business, doesn't mean they run a good business. Got it, should have checked references. 
Advice: 
  • Always check references before you hire someone, always. Big job, little job, shouldn't matter. You want it done right, correct? You want a company that stands behind its work, in case of a problem, correct?

    Sunday, March 4, 2012

    Cubbies for Twin Zone

    MUCH more is needed to organize this room, but this a great start... 

    Twin Zone Cubbies / Part 1

    Girls are ready....Buddy? You have the cubbies?

    Yes, and this is what he needed to make them.
    • 3/4" birch plywood for the top, bottom, sides and partitions
    • 1/4" ply for the back
    • solid wood nosing
    • satin poly
    • paint to match the wall
    Got it.
    Top and bottom with blind dado for partitions.
    Rabbet on partitions.
    I say "Do you really need to do all that?  Buddy says...yes :)
    3 coats of poly?  Really?  Buddy says YES!
    Okay, okay, let's put this thing together.
    We needed (yes, I did help)!
    • Wood Glue
    • Staples
    • Pin Gun & Pins
    • Biscuits
    • Compressor
    • Clamps....why do we need clamps?
    • Patience

    1/4" back fits nicely into the groove...well nicely until the top goes on :)  but we got through it. CLAMPS, that's why we needed the clamps!

    Girls, it's time to put ducks in a row...
    Nicely done.
    More cubbies to come...stay tuned.